

Visit Us At The Lanes Armoury In Brighton, Open 6 Days a Week, Rain or Shine. However, on Saturday & Sunday August 1st & 2nd Pride Weekend The Ground Floor Shop Will Be Closed {As Usual}.
As our family businesses {family motto; Gloria Antika} have been based in Brighton Lanes for over 100 years we are known around the world to dealers, historians, military families, museum curators, tv and movie companies, collectors and regular tourists and locals alike.
Brighton will be swamped with an extra few hundred thousand visitors on ‘Pride Weekend’ this coming 1st and 2nd of August. But, just as last year, we closed for the weekend, {we never open on Sundays anyway} as all the main old town centre access roads will be closed from Friday night until Sunday evening, and progress by visitors will be by foot only. It was a fabulous weekend last year, apparently, for all the local ‘service’ shops, restaurants, cafes, bars, pubs, hotels etc. but the retail stores will mostl likely close. If you are visiting Brighton then, enjoy, it is a wonderful experience, and great joy and fun will be had by all. Our first and top floor web-store office and apartments will be open as usual 24/7, for the whole weekend, but not the ground floor-gallery shop. But, you can contact us here by phone, or email the partners wherever they may be anytime. But please be patient for a reply.
Call anytime on our mobile number 24/7
07721 010085
To contact us by telephone from outside of the UK, call, 00 44 7721 010085 , or from North America 011 44 7721 010085.
Email; mail@thelanesarmoury.co.uk
Fun fact: Brighton pride will cover an area of approximately 9 square miles in Brighton this coming weekend, and will be attended by the equivalent of almost half the entire population of the state of Alaska in the United States. A state that has 148 cities, and is larger than Texas, California and Montana combined, covering 663,000 square miles
See photos 9 and 10 in the gallery to see some of our past friends, clients, and regulars, Lord ‘Larry’ Olivier, Dame Flora Robson, Max Miller & Graham Greene, plus, all the ‘Carry On’, actors arriving in our horse drawn carriage, in the early 1970’s, just near the Palace Pier, while filming ‘Carry On At Your Convenience’.
FYI, when they filmed to remake of Graham Greene’s classic ‘Brighton Rock’ with Dame Helen Mirren, a few years ago, they took over the Lanes and filmed inside and out of our shop for an entire week. Sadly, and ironically, all the Brighton location scenes were entirely cut out from the edited Final Cut, for apparently, Brighton wasn’t ‘Brighton’ enough. So the filmed the Brighton scenes in Eastbourne!. ‘That’s Show Business’ . read more
Price
on
Request

A Very Special Collection of Original Homer's Odyssean Period Weapons of Antiquity From the Siege Of Troy Era and Odysseus's Odyssey A 3200 Year Old Spear and Three Swords & A Gladius Hispaniensis From The Time Of Alexander and Early Rome
A special collection to celebrate the latest incredible film, Christopher Nolan's, The Odyssey. Starring Matt Damon, Anne Hathaway, Charlize Theron, Samantha Morton and Zendaya. It is always incredibly important that early history, of the earliest eras of Greek history, as related in Homer's great poetry, be once more brought to the world's consciousness, and what better way than a billion dollar film.
The poems described the era when the earliest Greek civilization's were destroyed, and to not reappear for hundreds of years, until the period of the Greek City states, ancient Greek writing, and the alphabet that appeared in the 800's B.C., All this following the Greek 'Dark Ages', that was sparked by the collapse of the Mycenaean civilization, and thus the consequences, according to Homer, of the fall of Troy.
It may be a somewhat fair approximation of The Odyssey, but all things considered, it was a superb film
The primary weapon of the Homeric period (depicted in the Iliad and the Odyssey) was the heavy throwing and thrusting spear, complemented by swords, daggers, and occasional ranged or specialized impact weapons.
Homeric combat blends late Bronze Age (Mycenaean) memories with the early Iron Age of Homer's own era, featuring a mix of bronze and iron equipment.
The spear or lance was the quintessential hero's weapon. Warriors typically carried two large spears, which were used both for long-range throwing and close-quarters thrusting.
The sword (xiphos / phasganon) was a secondary sidearm used when a spear broke or during close-quarters melee was the sword. These were relatively short, double-edged blades cast from bronze .The dagger (echeos / phasganon): was kept tucked next to the sword scabbard as a last-resort backup weapon for desperate hand-to-hand struggles.
The Odyssey is an epic poem in 24 books traditionally attributed to the ancient Greek poet Homer. The poem is the story of Odysseus, king of Ithaca, who wanders for 10 years (although the action of the poem covers only the final six weeks) trying to get home after the Trojan War. On his return, he is recognized only by his faithful dog and a nurse. With the help of his son, Telemachus, Odysseus destroys the insistent suitors of his faithful wife, Penelope, and several of her maids who had fraternized with the suitors and reestablishes himself in his kingdom.
Epics such as the Iliad and the Odyssey emerged from an oral tradition in which poets, or bards, performed epic narratives before audiences, with fixed written texts appearing much later. The written texts employed various literary devices such as formulaic epithets and repetition which helped performers memorize the poem and adapt during their recitation. For centuries, Homeric epics formed part of the educational foundation of the Greek world throughout the classical age and helped shape a broader Panhellenic cultural identity.
The Odyssey does not follow a linear chronology. The reader begins in the middle of the tale, learning about previous events only through Odysseus’s retelling. The first four books set the scene in Ithaca. Penelope, Odysseus’s wife, and their young son, Telemachus, are powerless before her arrogant suitors as they despair of Odysseus’s return from the siege of Troy. Telemachus is searching for news of his father, who has not been heard from since he left for war nearly 20 years earlier. He journeys secretly to the Peloponnese and seeks out two men who fought with Odysseus in the war at Troy, Nestor and Menelaus, and discovers that his father is indeed still alive. read more
Price
on
Request
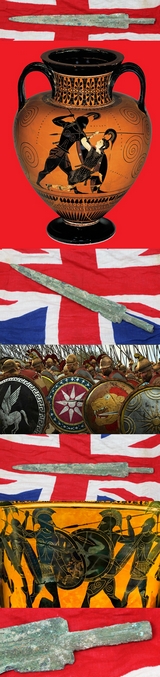
A Superb Excavated ‘Grand Tour’ Fine Bronze Age Spear Head, Trojan War Period 3200+ Years Old. From the Legendary Age of Odysseus, Hector, Agamemnon, Paris, Helen of Troy and Achilles
Dominant central rib, graduating long triangular blade and engraved socket. A lance or spear head traded with the Eastern Mediterranean Scythians, Persians and Greeks during the 2nd to Ist millennium B.C. up to 3200 years ago. Copper alloy circa 1200 B.C. A beautiful Bronze Age battle spear, probably the most used and popular weapon of all the ancient wars of antiquity. Items such as this were oft acquired as antique collectibles from antiquity, in the 18th and early 19th century, by British noblemen and women touring famous battle sites and their regions in Europe, especially Northern France, Italy and the Middle East on their Grand Tour.
Originally placed on display in the family 'cabinet of curiosities', within their country house upon their return home. A popular pastime in the 18th and 19th century, comprised of English ladies and gentlemen traveling for many months, or even years, througout classical Europe, and Middle East, acquiring antiquities and antiques for their private collections.
One such family’s descendants have been allowing us to purchase such wonderful pieces from their family collection for around the past 30 years.
We are very privileged to be the UK’s premier original military antiques gallery and website, and to be able to consistently, continually, and regularly, offer the finest original collectors items in our shop for over 100 years
This is a most handsome ancient bronze weapon from the era of the so called Trojan Wars. The ancient Greeks believed the Trojan War was a historical event that had taken place in the 13th or 12th century BC, and believed that Troy was located in modern day Turkey near the Dardanelles. In Greek mythology, the Trojan War was waged against the city of Troy by the Achaeans (Greeks) after Paris of Troy took Helen from her husband Menelaus, the king of Sparta. The war is among the most important events in Greek mythology and was narrated in many works of Greek literature, including Homer's Iliad and the Odyssey . "The Iliad" relates a part of the last year of the siege of Troy, while the Odyssey describes the journey home of Odysseus, one of the Achaean leaders. Other parts of the war were told in a cycle of epic poems, which has only survived in fragments. Episodes from the war provided material for Greek tragedy and other works of Greek literature, and for Roman poets such as Virgil and Ovid.
The war originated from a quarrel between the goddesses Athena, Hera, and Aphrodite, after Eris, the goddess of strife and discord, gave them a golden apple, sometimes known as the Apple of Discord, marked "for the fairest". Zeus sent the goddesses to Paris, who judged that Aphrodite, as the "fairest", should receive the apple. In exchange, Aphrodite made Helen, the most beautiful of all women and wife of Menelaus, fall in love with Paris, who took her to Troy. Agamemnon, king of Mycenae and the brother of Helen's husband Menelaus, led an expedition of Achaean troops to Troy and besieged the city for ten years due to Paris' insult. After the deaths of many heroes, including the Achaeans Achilles and Ajax, and the Trojans Hector and Paris, the city fell to the ruse of the Trojan Horse. The Achaeans slaughtered the Trojans (except for some of the women and children whom they kept or sold as slaves) and desecrated the temples, thus earning the gods' wrath. Few of the Achaeans returned safely to their homes and many founded colonies in distant shores. The Romans later traced their origin to Aeneas, one of the Trojans, who was said to have led the surviving Trojans to modern day Italy. Made in copper bronze in the Western Asiatic region. Western Asiatic bronzes refer to items dating from roughly 1500-500 BC that have been excavated since the late 1920?s in the Harsin, Khorramabad and Alishtar valleys of the Zagros Mountains especially at the site of Tepe Sialk. Scholars believe they were created by either the Cimmerians or by such related Indo-European peoples as the early Medes and Persians. Weapons from this region were highly sought after by warriors of many cultures because of their quality, balance and durability. Graduating blade with socket. Rich deep age patination with superb natural encrustations This piece is 14 1/2 inches long overall. As with all our items it comes complete with our certificate of authenticity. read more
1380.00 GBP

A Simply Wonderful Original Trojan War Period Full Length Bronze Sword Blade, 21 Inches Long. Circa 1200 B.C.Archean Greeks, the Mycenean Greeks, The Trojans & The Hitites. From The Warring Times Of Menalaus King of Sparta & King Agamemnon
2nd millennium BC. A simply fabulous historical ancient bronze sword with stunning natural aged patination of richest dark emerald green. Long, tapering, raised median ridged blade with graduating parallel, multiple, low ridges, alongside the central rib, only a very short, cylindrical, partial tang remains. Originally it would have been fitted with a likely organic hilt of possibly ivory or carved horn or hardwood. A sword that would have been eagerly traded with the Archean Greeks, the Mycenean Greeks, the Trojan peoples and The Hitites.
In the gallery we show museum exhibited Attic pottery of the time with ancient Minoans fighting the Minotaur, and illustrations where the ancient Trojan and Mycenaean warriors, all are using the exact form of sharply graduating sword, all having that most identifiable central median rib, as this beautiful sword.
The trade of Bronze Age weaponry followed trade routes that started in the the Assyrian Empire, East of Babylon, right through to the Mediterranean region, and all of empires and kingdoms in between. Also, all manner of Bronze Age utilitarian wares, personal adornments, and tools came from this famed bronze smithing region and their trading merchants.
In Greek mythology, the Trojan War was waged against the city of Troy by the Achaeans (Greeks) after Paris of Troy took Helen from her husband Menelaus, king of Sparta. The war is one of the most important events in Greek mythology and has been narrated through many works of Greek literature, most notably Homer's Iliad. The core of the Iliad (Books II – XXIII) describes a period of four days and two nights in the tenth year of the decade-long siege of Troy; the Odyssey describes the journey home of Odysseus, one of the war's heroes. Other parts of the war are described in a cycle of epic poems, which have survived through fragments. Episodes from the war provided material for Greek tragedy and other works of Greek literature, and for Roman poets including Virgil and Ovid.
The ancient Greeks believed that Troy was located near the Dardanelles and that the Trojan War was a historical event of the 13th or 12th century BC, but by the mid-19th century AD, both the war and the city were widely seen as non-historical. In 1868, however, the German archaeologist Heinrich Schliemann met Frank Calvert, who convinced Schliemann that Troy was a real city at what is now Hisarlik in Turkey. On the basis of excavations conducted by Schliemann and others, this claim is now accepted by most scholars.
Whether there is any historical reality behind the Trojan War remains an open question. Many scholars believe that there is a historical core to the tale, though this may simply mean that the Homeric stories are a fusion of various tales of sieges and expeditions by Mycenaean Greeks during the Bronze Age. Those who believe that the stories of the Trojan War are derived from a specific historical conflict usually date it to the 12th or 11th century BC, often preferring the dates given by Eratosthenes, 1194–1184 BC, which roughly correspond to archaeological evidence of a catastrophic burning of Troy VII, and the Late Bronze Age collapse. Legend has it that the war originated from a quarrel between the goddesses Hera, Athena, and Aphrodite, after Eris, the goddess of strife and discord, gave them a golden apple, sometimes known as the Apple of Discord, marked "for the fairest". Zeus sent the goddesses to Paris of Troy, who judged that Aphrodite, as the "fairest", should receive the apple. In exchange, Aphrodite made Helen, the most beautiful of all women and wife of Menelaus of Sparta, fall in love with Paris, who quit Sparta with her and returned to Troy. Menelaus's brother Agamemnon, king of Mycenae, led an expedition of Achaean troops to Troy and besieged the city for ten years because of Paris' insult. After the deaths of many heroes, including the Achaeans Achilles and Ajax, and the Trojans Hector and Paris, the city fell to the ruse of the Trojan Horse. The Achaeans slaughtered the Trojans (except for some of the women and children whom they kept or sold as slaves) and desecrated the temples, thus earning the gods' wrath. Few of the Achaeans returned safely to their homes and many founded colonies in distant shores. The Romans later traced their origin to Aeneas, Aphrodite's son and one of the Trojans, who was said to have led the surviving Trojans to modern-day Italy.
Most of our antiquities and artefacts are from 200 year past souvenir accumulations from British ‘Grand Tours’. Beautiful Items and antiquities were oft acquired in the 18th and early 19th century by British noblemen and women touring battle sites in Northern France and Italy, in fact most of Europe and the Middle East, on their so-called ‘Grand Tour’. They were often placed on display upon their return home, within the family’s ‘cabinet of curiosities’, within their country house. Some significant British stately homes had entire galleries displaying the treasures and artefacts gathered and purchased on such tours, and some tours lasted many years, and the accumulated souvenirs numbered in their hundreds or even thousands
As with all our items it comes complete with our certificate of authenticity. read more
3450.00 GBP
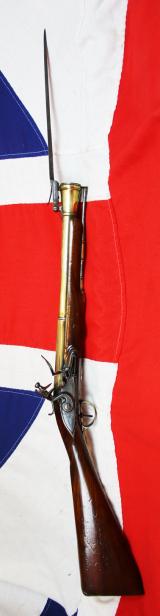
A Superb Royal Naval, Brass Cannon Barrel Blunderbuss With Finest 'Juglans Regia' Walnut Stock Spring Bayonet, Elaborately Engraved All Brass Furniture, by Daykin of Nottingham
Manufactured circa 1780, this is a jolly rare and stunningly beautiful example of a brass, cannon barrelled blunderbuss, from the mid Georgian period, with a sprung loaded, quick-release snap-bayonet. Overall in superb condition for age.
A hugely popular gun used aboard naval ships by their captains in the era of King George IIIrd during the American Revolution and including the Napoleonic Wars, from the days of Admiral Nelson's Victory at Trafalgar. The rarest of the types used had a spring loaded bayonet that was incredibly effective for use after the blunderbuss had discharged its load against any 'boarders', and to effect the 'coup de gras' {the stroke of grace} to those that are still determinedly putting up a fight against the British ship's captain.
The three-stage round barrel has a flared muzzle and turned moldings. The sprung bayonet is fitted beneath, and the ramrod is housed to left side. The right side of the breech is struck with Tower private proof marks and the maker’s mark. The engraved action is signed "Daykin" and the barrel engraved " Daykin Nottingham" the blunderbuss has finest and elaborately engraved brass fittings, including the trigger guard. with a beautiful acorn finial.
The figured walnut buttstock it mounted with an engraved brass buttplate. The ramrod is in traditional naval service steel
The Blunderbuss (born of the Dutch word "Donderbus", appropriately meaning "Thunder Pipe" or "Thunder Gun") came to prominence in the early part of the 18th Century (1701-1800) and was more akin to the modern day shotgun than a "long gun" musket or heavy pistol of the time. As such, she excelled in close-in fighting, be it within the confines of naval warfare or walled nature of the urban environment, such as for protection of a Royal Mail coach, where her spread of shot could inflict maximum damage to targets at close ranges. Its manageable size, coupled with its spread shot, ensured some level of accuracy for even the novice user and its appearance was rather intimidating to those unfortunate enough to be staring down the business end, and the flashing bayonet nicely finished off those that survived the first salvo of shot! As with modern firearms, the Blunderbuss also made for an excellent security-minded weapon and soon found popularity amongst all matter of operators - military, civilian and, of course, criminal parties - by the middle of the 1700s. Even George Washington championed the Blunderbuss for Continental Army "Dragoon" units of the burgeoning American military as opposed to the carbine this being nothing more than a full-featured long gun of lesser overall length, proving suitable for horse-mounted handling. In fact, the short-form version of the Blunderbuss came to be known as the "Dragon", giving rise to the term "Dragoon" for such gun-wielding cavalrymen. Dragoons went on to form specialized units of mounted infantrymen within their respective armies during the end of the 17th Century and into the middle of the 18th Century - in a way, becoming an evolutionary step of the fabled mounted knight of the Middle Ages. Their use of Dragons soon gave way to the widely-accepted carbine musket. The Blunderbuss was also known as the "Blunderbess"
As with all our antique guns no license is required as they are all unrestricted antique collectables
The stock is superb with some edge bruising etc. around the lock. read more
3850.00 GBP

A Beautiful, Pirate Age, Late 17th Century Brass Barrel Blunderbuss By William Wallis & John Hall. Barrel Proofs of 1690. John Hall Supplier of Fuzees, Buccaneer Guns & Blunderbusses For The Royal African Co. King William IIIrd to Queen Anne Period
A stunning blunderbuss desirable for service, both on the company galleons of the merchants, and, the pirate's galleons that pillaged them in the 17th century seven seas.
Finest walnut stock, all brass furniture finely engraved, widely flared brass barrel proofed by its maker William Wallis, with his crowned WW proof stamp, and also, bearing King William IIIrd's 1690 proofs. the steel lock engraved for the guns maker John Hall.
In the mid to late 17th century in the Western world, the period from the 1680s to the 1720s, has come to be known as the ‘Golden Age’ of piracy.
This was a time of heightened pirate activity, when thousands of ships in the Atlantic and beyond became the prey of roving bands of sea-robbers. Many of the most infamous pirates and buccaneers from history come from this era, Edward 'Blackbeard' Teach, Captain William Kidd, Anne Bonny, 'Calico' Jack Rackham, Henry Morgan, Stede Bonnet and more.
The Caribbean and the east coast of North America were the main areas that saw a surge in activity in the early 1700s. Ships carrying expensive cargoes were often intercepted, and stolen goods were sold in nearby islands and European colonies. Some pirates operated further afield, off the West African coast or in the Indian Ocean, where the island of Madagascar became a key base.
The real Pirates of the Caribbean
"The ‘golden age’ of piracy coincided with the expansion of English, later British, colonial activity around the Caribbean," writes Blyth. "This began in earnest with the capture of Jamaica from Spain in 1655." While piracy has been traditionally portrayed as a male-dominated pursuit, historical evidence suggests that women actively participated in piratical activities during various periods. In the Golden Age of Piracy, from the late 17th to the early 18th centuries, the presence of women in pirate crews became more pronounced. Anne Bonny and Mary Read are two notable examples of women who defied societal norms and navigated the perilous waters of piracy alongside their male counterparts. Their inclusion in pirate crews challenged prevailing gender roles and added a layer of complexity to the maritime lore of the era.
The story of Henry Morgan
Henry Morgan, a British privateer turned pirate, rose to prominence as a cunning strategist and a master of raiding Spanish colonies. Born circa 1635 in Wales, Morgan's early life remains relatively obscure, with scant historical records providing details about his upbringing. His maritime career began as a privateer, authorized by English authorities to harass Spanish colonies and shipping interests in the Caribbean during a period marked by geopolitical tensions between England and Spain.
Sir Henry Morgan was a unique individual in the history of buccaneering. He started out life as an indentured servant on a plantation in Barbados, but worked himself up to become one of the most notorious buccaneers there ever was, receiving not only praise from his uncouth brethren of the coast, but also from his king, who rewarded him with the a knighthood and a lofty position. Morgan had connections running in all levels of society, from the lowest dregs, his mutinous crewmen, to the highest echelons of nobility. Together with his loyal friend and crony, Sir Thomas Modyford, he rampaged the Spanish territories in the Caribbean, his name inspiring fear along the vast coastline of New Spain and its dependencies. Through his network he was able to operate as a broker between criminals from various countries and a nation state, culminating in the biggest amphibious buccaneering raid ever in the Caribbean and the destruction of the once proud city of Panama, of which the ruins can still be visited today. The expected end for a man of his making would be at the gallows, or swinging from the gibbet in some port or another. But not for Sir Henry Morgan. His networking skills protected him, set him up with a respectable position after his career as a buccaneer, and provided him with the luxury of drinking himself to death in the comfort of his own home at the ripe age of 53; a fate most other pirates must have surely envied him for. His exploits in the plunder of Port Royal and the attack on Spanish merchant ships contributed to the era’s rich folklore and became the stuff of legends. Sabatini based the first part of the story of Blood on Henry Pitman, a surgeon who tended the wounded Monmouth rebels and was sentenced to death by Judge Jeffreys, but whose sentence was commuted to penal transportation to Barbados where he escaped and was captured by pirates. Unlike the fictional Blood, Pitman did not join them, and eventually made his way back to England where he wrote a popular account of his ordeal. For Blood's life as a buccaneer, Sabatini used several models, including Henry Morgan and the work of Alexandre Exquemelin, for historical details
The motivations for women to join pirate crews were as diverse as those of their male counterparts. Some, like Anne Bonny and Mary Read, disguised themselves as men to gain access to the adventurous and lucrative world of piracy. Their ability to conceal their gender allowed them to operate freely within the confines of a pirate ship, participating in raids, engaging in combat, and earning the respect of their fellow crew members. The reasons for adopting a pirate's life were multifaceted, often stemming from a desire for economic independence, a rejection of societal constraints, or a quest for personal freedom in an era when opportunities for women were limited.
Anne Bonny, as pictured in Charles Johnson’s 1724 book, A General History of the Robberies and Murders of the most notorious Pyrates. Anne Bonnya (disappeared after 28 November 1720) was a pirate who served under John Rackham. Amongst the few recorded female pirates in the Golden Age of Piracy, she has become one of the most recognized pirates of the era, as well as in the history of piracy in general.
The first biography of Bonny comes from Captain Charles Johnson's 1724 book A General History of the Pyrates. In August 1720, Bonny, Rackham, and another woman, Mary Read, together with about a dozen other pirate crewmembers, stole the sloop William, then at anchor in Nassau harbor, and put out to sea. The crew spent months in the West Indies attacking merchant ships. Bonny took part in piracy alongside the men, handing out gunpowder to fellow pirates, a job usually referred to as a powder monkey. On 5 September 1720, Governor Rogers put out a proclamation, later published in The Boston Gazette, demanding the arrest of Rackham and his associates. Among those named are Anne Bonny and Mary Read
Capt. Sir Henry Morgan, as pictured in Alexandre Exquemelin's Piratas de la America (1681) It is probable that in the early 1660s Morgan was active with a group of privateers led by Sir Christopher Myngs attacking Spanish cities and settlements in the Caribbean and Central America when England was at war with Spain. It is likely that in 1663 Morgan captained one of the ships in Myngs' fleet, and took part in the attack on Santiago de Cuba and the Sack of Campeche on the Yucatán Peninsula
Capt. Stede Bonnet flew a Jolly Roger flag {from A General History of the Pyrates 1724}
Stede Bonnet (c. 1688 – 10 December 1718) was an English pirate who was known as the Gentleman Pirate because he was a moderately wealthy landowner before turning to a life of crime. Bonnet was born into a wealthy English family on the island of Barbados, and inherited the family estate after his father's death in 1694. Despite his lack of sailing experience, Bonnet decided he should turn to piracy in the spring of 1717. He bought a sailing vessel, the Revenge, and traveled with his paid crew along the Eastern Seaboard of what is now the United States, capturing other vessels and burning other Barbadian ships.
Bonnet set sail for Nassau in the Bahamas, to the haven for pirates known as the "Republic of Pirates", but he was seriously wounded en route during an encounter with a Spanish warship. After arriving in Nassau, Bonnet met the infamous pirate Blackbeard. Incapable of leading his crew, Bonnet temporarily ceded his ship's command to Blackbeard. Before separating in December 1717, Blackbeard and Bonnet plundered and captured merchant ships along the East Coast. After Bonnet failed to capture the Protestant Caesar, his crew abandoned him to join Blackbeard aboard the Queen Anne's Revenge. Bonnet stayed on Blackbeard's ship as a guest, and did not command a crew again until summer 1718, when he was pardoned by North Carolina governor Charles Eden and received clearance to undertake privateering against Spanish shipping interests. Bonnet was tempted to resume his piracy but did not want to lose his pardon, so he adopted the alias "Captain Thomas" and changed his ship's name to Royal James. He had returned to piracy by July.
The brass barrel and the guns brass furniture are in superb condition, the steel lock is good, with working action, and bearing old surface russetting traces, typical of sea service guns, bearing the maker's name engraved of HALL. The walnut stock has a breathtaking patination, garnered over three centuries of dedicated polishing and care, and has the usual combat surface marks and light cracks thereon as to be expected.
15 inch barrel, overall 30.5 inches read more
4450.00 GBP

A Fine 18th Century Historic Blunderbuss With Brass Flared Mouth Barrel, Fine Walnut Stock and Engraved Brass Furniture. By Griffin and Tow London Circa 1775. One Of England's Great Gunsmith Partnerships
Joseph Griffin opened his business in 1739 in Bond Street London, and went into partnership with Tow in 1773 to form the well known gunmakers Griffin and Tow.
This is an incredible brass barreled blunderbuss, of great age, around 250 years old, and with immense character. It has clearly seen combat service and use, but it is now just so beautiful still as an original artifact of the American Revolutionary War period, by one of the great gun partnerships in Georgian England. It has accumulated fabulous patination on the both the stock and barrel through the centuries of cleaning and polishing, interspersed with close combat use in the war, in fact, probably several wars, and potentially dozens of battles, either at sea, or on land, in its working life of around 80 years.
During this use period it has had close quarter combat injury, likely caused by its use as a club, after its load was discharged and their was no time for re-loading. It is around the stock, at the butt, and it has seen a typical, contemporary 'field service' combat repair, probably by the ship's carpenter, that has actually acquired its own age patination, through constant polishing. The barrel is excellent, with Joseph Griffin's own proof stamp, between the regular proof-house stamps, with numerous very small combat service markings, likely from sword or cutlass impacts. If you observe picture 10 in the gallery, you will note at the top portion of the painting, a sailor about to fire his brass barrel blunderbuss into the boarding enemy, and that sailor is using his blunderbuss as a club, holding the barrel as its handle.
In the 18th century, naval forces, privateers, and pirates used the blunderbuss as a short-range, large-bore combat weapon designed primarily for chaotic close-quarters boarding actions.
Naval blunderbusses often featured brass barrels instead of iron or steel because brass resisted corrosion and was practically impervious to salty sea spray.
The iconic trumpet-shaped muzzle was not actually designed to scatter shot widely, but rather to act as a built-in funnel for quickly pouring in black powder and lead balls while on a rolling ship deck.
While military loads typically used lead balls, swan shot (large pellets), or iron slugs, sailors could improvise by loading with rock salt for psychological effect without the likely-hood of fatal injury being inflicted
For use as boarding weapons they were ssued to naval officers, marines, and pirate crews, standard shoulder-stock blunderbusses easily cleared enemy decks during intense close-quarters fighting.
The Blunderbuss (born of the Dutch word "Donderbus", appropriately meaning "Thunder Pipe" or "Thunder Gun") came to prominence in the early part of the 18th Century (1701-1800) and was more akin to the modern day shotgun than a "long gun" musket or heavy pistol of the time. As such, she excelled in close-in fighting, be it within the confines of naval warfare or walled nature of the urban environment, where her spread of shot could inflict maximum damage to targets at close ranges. Its manageable size, coupled with its spread shot, ensured some level of accuracy for even the novice user and its appearance was rather intimidating to those unfortunate enough to be staring down the business end. As with modern firearms, the Blunderbuss also made for an excellent security-minded weapon and soon found popularity amongst all matter of operators - military, civilian and, of course, criminal parties - by the middle of the 1700s. Even George Washington championed the Blunderbuss for Continental Army "Dragoon" units of the burgeoning American military as opposed to the carbine this being nothing more than a full-featured long gun of lesser overall length, proving suitable for horse-mounted handling. In fact, the short-form version of the Blunderbuss came to be known as the "Dragon", giving rise to the term "Dragoon" for such gun-wielding cavalrymen. Dragoons went on to form specialized units of mounted infantrymen within their respective armies during the end of the 17th Century and into the middle of the 18th Century - in a way, becoming an evolutionary step of the fabled mounted knight of the Middle Ages. Their use of Dragons soon gave way to the widely-accepted carbine musket. The Blunderbuss was also known as the "Blunderbess" As with all our antique guns no license is required as they are all unrestricted antique collectables
Griffin and Tow was a prominent 18th-century London gunmaking partnership renowned for crafting high-quality flintlock sporting guns, officers' pistols, and blunderbusses.
Joseph Griffin began his independent gunmaking career in 1739 on Bond Street, London. He worked alongside his father until 1770 and built a strong reputation for producing exceptional flintlock firearms. Joseph Griffin entered into a partnership with an individual named Tow in 1773, officially establishing the firm Griffin and Tow.
The business operated out of London during the height of Georgian flintlock craftsmanship, active through the late 18th century (roughly spanning the 1740–1790 era when including Griffin's individual work before the partnership).
They specialized in fine flintlock weapons, including double-barrelled sporting shotguns, private officer pistols, and brass-barreled muzzleloading blunderbusses.
Surviving pieces from the firm, in the great museum collections today—often featuring intricately engraved brass or steel, and walnut stocks and are highly valued collector's items today.
Their operational history and specific surviving serial/named pieces were meticulously cataloged in the seminal 1989 text British Gunmakers: Messrs. Griffin and Tow and W. Bailes, 1740-1790 by W. Keith Neal and D.H.L. Back read more
3350.00 GBP

Red Cross 'Shoots Itself In The Foot’ with Gun Maker Livery Co. The Worshipful Co. Of Gumakers Ban at Tower of London Charity Function. The Livery Companies Collectively Give 81 Million Pounds A Year To Charities.
Yes, as incredible as it may seem, the Gunmakers Co. Of Liveryman, The Worshipful Co. Of Gumakers, founded in 1637, are not welcome at a ‘Tower Of London’ Red Cross Fundraiser. The ‘Tower of London’ arms and armour collection, accumulated since the time of Henry VIIIth, is one of the largest and most important arms collections in the world. To us, it would be comparable to hosting a charity fund raiser at Guys Hospital in London, where surgeons would be excluded and unwelcome..
‘Pretty much all of the Masters have said, “Well, if you’re not willing to accept Masters of other companies, {The Worshipful Company of Gunmakers etc.} we’re not going to take part”
Copied Article By Richard Eden Daily Mail;
Four days during the war, it held Hitler’s deputy Rudolf Hess and – just over a decade later – psychopathic twins Ronnie and Reggie Kray.
But the Tower of London, home to the Crown Jewels and scene of innumerable executions, is now adding another page or two to its infamies – albeit, on this occasion, unwittingly.
For I can disclose that a charitable event that the Tower has hosted for many years – raising thousands of pounds for the Red Cross in the process – has fallen victim to political correctness.
Formerly known as ‘Jailed & Bailed’, but now prosaically renamed ‘Escape From The Tower’, the event is philanthropy with a pantomime flourish.
It sees – or used to see – Masters of various City of London livery companies ‘arrested’ by the City of London Police, taken to the Tower and, as one of livery company notes, ‘“tortured” with sponsored champagne and a splendid lunch’ until their fellow liverymen and women secure their release by raising a ‘bail payment’, often amounting to tens of thousands of pounds, with every penny going to the Red Cross.
But this year the Worshipful Company of Tobacco Pipe Makers was told by the Red Cross that ‘they couldn’t take part because they represented an “unethical” industry’, explains an eminent liveryman, adding that at least one other livery company was placed on a blacklist because of ‘links with the defence industry’.
I understand that this was the Worshipful Company of Gunmakers – one of the oldest livery companies, founded in 1637. ‘They actually test the guns that the police use,’ an appalled liveryman tells me.
The Red Cross, headed by Beatrice Butsana-Sita since 2023, seemingly exacerbated matters by sending out ‘a sort of clarifying note’, stating that, while ‘deeply grateful for the livery companies’ long-standing support’, it was aware of ‘a very small number of livery companies with direct public association with, or funding from, our excluded industries’.
This couldn’t have gone down worse. ‘Pretty much all of the Masters have said, “Well, if you’re not willing to accept Masters of other companies, we’re not going to take part”,’ says a liveryman from one of the companies which, collectively, give some £81million a year to charities.
‘Previously, there’s been a lot of support for the Red Cross. But, no pun intended, they’ve really shot themselves in the foot.’
The Red Cross assures me that it ‘greatly values the long-standing partnership and generosity of London’s livery companies’, adding: ‘We do not accept donations from a very small number of specific industries.
‘We are speaking directly with livery companies to provide clarification, answer questions and reaffirm how much we value their continued support.’
The Lanes Armoury comment.
‘Why even hold a charitable fund raiser at ‘The Tower of London’ if the ‘Gunmakers Liverymen’ are not welcome. It is beyond understanding and all sane rationale.
By RICHARD EDEN, DIARY EDITOR DAILY MAIL
PUBLISHED: 00:59, 1 August 2026 | UPDATED: 07:57, 1 August 2026
https://www.dailymail.com/news/article-16020461/RICHARD-EDEN-Red-Cross-woke-ban-Tower-charity.html read more
Price
on
Request
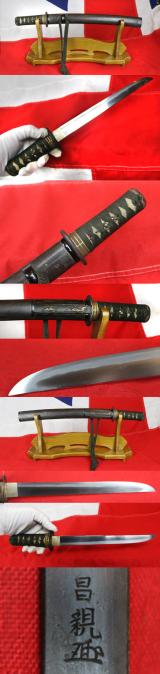
A Beautiful Antique Edo Period 1598-1868 Tanto Signed Satsuma ju Yoshizane
In all original Edo period mounts fittings and saya, stunning ishime stone finish lacquer to the saya in pristine condition.
Kozuka utility knife also signed with maker's signature. See photo 10 in the gallery
Pair of menuki of gold embellished flower sprays, iron silver inlaid kashira, gilt and nanko fuchi.
Blade in full traditional stone polish showing a delightful notare hamon.
Tanto are generally forged in hira-zukuri style (without ridgeline), meaning that their sides have no ridge line and are nearly flat, unlike the shinogi-zukuri structure of a katana. Some tanto have particularly thick cross-sections for armour-piercing duty, and are called yoroi toshi. Tanto first began to appear in the Heian period, however these blades lacked artistic qualities and were purely weapons. In the Early Kamakura period high quality tanto with artistic qualities began to appear, and the famous Yoshimitsu (the greatest tanto maker in Japanese history) began his forging. Tanto production increased greatly around the Muromachi period and then dropped off in the Shinto period. Shinto period tanto are quite rare. Tanto were mostly carried by Samurai; commoners did not generally carry them. Women sometimes carried a small tanto called a kaiken in their obi for self defence. It was sometimes worn as the shoto in place of a wakizashi in a daisho, especially on the battlefield. Before the 16th century it was common for a Samurai to carry a tachi and a tanto as opposed to a katana and a wakizashi.
. read more
3750.00 GBP
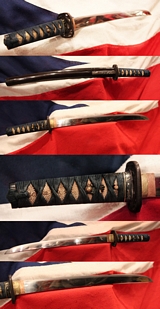
Huge & Impressively Bladed 400 Year Old Samurai Tanto Signed Omi Kami Minamoto Kagehiro. Shinto Period From The Province of Settsu
A beautiful and large samurai dagger, with fine 'status' blade. Squared sukashi tsuba in iron, pure gold inlaid shakudo fushi, decorated with a constellation of stars and celestial bodies, that are inlaid with gold over a nanako ground, with a carved and polished buffalo horn kashira.
Pure gold and shakudo menuki of takabori crabs. Fine shakudo kozuka decorated in relief with mount Fuji, two piece habaki. Wide blade without ridge line flat sided with suguha hamon. A most impressive and sizeable tanto.
It has its original Edo period lacquered saya scabbard in rich dark brown urushi lacquer, with a kozuka {utility knife} of shakudo, decorated with a fishermen within a small boat, with Mount Fuiji in the distance. The kozuka blade is very nicely signed.
Shakudo is a billon of gold and copper (typically 4-10% gold, 96-90% copper) which can be treated to form an indigo/black patina resembling lacquer. Unpatinated shakudo Visually resembles bronze; the dark color is induced by applying and heating rokusho, a special patination formula.
Shakudo Was historically used in Japan to construct or decorate katana fittings such as tsuba, menuki, and kozuka; as well as other small ornaments. When it was introduced to the West in the mid-19th century, it was thought to be previously unknown outside Asia, but recent studies have suggested close similarities to certain decorative alloys used in ancient Egypt, Greece, and Rome. The lacquer surface of the saya has some age bruising etc. due to its vintage. read more
3995.00 GBP