


A Most Rare & Stunningly Beautiful Imperial Russian Superior Cavalry Officer's Sword, Romanov Era, From the First Quarter to Mid 19th Century. A War Trophy of the Crimean War
Curved, bright polished single edge blade, cut with 2 fullers (one broad, one narrow), very fine brass hilt decorated throughout with laurel and acanthus leaves and foliage in relief, a knuckle bow with two bar guards, and a superb original wire bound polished horn grip, with a typically Russian form of forward slanted pommel, with pommel ball.
Original Imperial Russian Romanov period officer's swords of the 19th century appear very rarely indeed, as so few survived the revolution, and when they do, if they are the very fine quality examples, they can achieve extraordinarily high prices. It is certainly possible this sword is a trophy of the Crimean War.
This superb sabre would likely have seen its most combative service in the Crimea, such as at The Battle of Balaclava that is remembered in Britain for the actions of two British units. At the start of the battle, a large body of Russian cavalry charged the 93rd Highlanders, who were posted north of the village of Kadikoi. Commanding them was Sir Colin Campbell. Rather than "form square", the traditional method of repelling cavalry, Campbell took the risky decision to have his Highlanders form a single line two men deep. Campbell had seen the effectiveness of the new Minié rifles with which his troops were armed at the Battle of Alma, a month earlier, and he was confident that his men could beat back the Russians. His tactics succeeded. From up on the ridge to the west, Times correspondent William Howard Russell saw the Highlanders as a "thin red streak topped with steel", a phrase which soon became the "Thin Red Line".
Soon afterward, a Russian cavalry movement was countered by the Heavy Brigade, which charged and fought hand to hand until the Russians retreated. That caused a more widespread Russian retreat, including a number of their artillery units. After the local commanders had failed to take advantage of the retreat, Lord Raglan sent out orders to move up and to prevent the withdrawal of naval guns from the recently captured redoubts on the heights. Raglan could see those guns because of his position on the hill. In the valley, that view was obstructed, and the wrong guns were in sight to the left. The local commanders ignored the demands, which led to the British aide-de-camp, Captain Louis Nolan, personally delivering the quickly-written and confusing order to attack the artillery. When Lord Lucan questioned to which guns the order referred, the aide-de-camp pointed to the first Russian battery that he could see and allegedly said "There is your enemy, there are your guns", because of his obstructed view, which were wrong. Lucan then passed the order to the Earl of Cardigan, which resulted in the Charge of the Light Brigade.
The House of Romanov was the reigning imperial house of Russia from 1613 to 1917. They achieved prominence after Anastasia Romanovna married Ivan the Terrible, the first crowned tsar of all Russia. Nicholas II, the last Emperor of Russia, and his immediate family were executed in 1918, but there are still living descendants of other members of the imperial house.
Romanov 19th century history;
Paul I was murdered in his palace in Saint Petersburg in 1801. Alexander I, succeeded him on the throne and later died without leaving a son. His brother, crowned Nicholas I, succeeded him on the throne in 1825. The succession was far from smooth, however, as hundreds of troops took the oath of allegiance to Nicholas's elder brother, Constantine Pavlovich who, unbeknownst to them, had renounced his claim to the throne in 1822, following his marriage. The confusion, combined with opposition to Nicholas' accession, led to the Decembrist revolt. Nicholas I fathered four sons, educating them for the prospect of ruling Russia and for military careers, from whom the last branches of the dynasty descended.
Alexander II, son of Nicholas I, became the next Russian emperor in 1855, in the midst of the Crimean War. While Alexander considered it his charge to maintain peace in Europe and Russia, he believed only a strong Russian military could keep the peace. By developing the Imperial Russian Army, giving increased autonomy to Finland, and freeing the serfs in 1861 he gained much popular support for his reign.
The Crimean War was fought from October 1853 to February 1856 between the Russian Empire and an ultimately victorious alliance of the Ottoman Empire, France, the United Kingdom, and Sardinia-Piedmont.
Geopolitical causes of the war included the decline of the Ottoman Empire (the "Eastern Question"), the expansion of Russia in the preceding Russo-Turkish Wars, and the British and French preference to preserve the Ottoman Empire to maintain the balance of power in the Concert of Europe. The flashpoint was a disagreement over the rights of Christian minorities in Palestine, then part of the Ottoman Empire, with the French promoting the rights of Roman Catholics, and Russia promoting those of the Eastern Orthodox Church.
The Crimean War marked a turning point for the Russian Empire. The war weakened the Imperial Russian Army, drained the treasury and undermined Russia's influence in Europe. The empire would take decades to recover. Russia's humiliation forced its educated elites to identify its problems and recognise the need for fundamental reforms. They saw rapid modernisation as the sole way to recover the empire's status as a European power. The war thus became a catalyst for reforms of Russia's social institutions, including the abolition of serfdom and overhauls in the justice system, local self-government, education and military service.
In excellent condition overall considering this fabulous and incredibly rare sabre’s cavaly officer has obviously seen hand-to-hand combat, thus there is very light and minuscule overall surface wear to the steel blade, but it is still very fine indeed, very bright and wonderfully polished. On the hilt’s upper section of knuckle-bow, on the inner side, there is a very fine tiny combat-stress hairline {see photo 6}. Likely caused by a combat punch action impact of the hilt against a resistant object, possibly a helmet. Blade overall 38 .75 inches long, blade 31.75 inches long. No scabbard
Possibly by Schaaf & Söhne St. Petersburg.
We have seen Imperial Russian, of very similar quality and design, officer’s dragoon swords, such as a later pattern St Anne’s dragoon sword for bravery, sell for up to £30,000, so relatively, this sword is most inexpensive by comparison.. read more
3750.00 GBP

A Wonderful, Original, Antique Victorian Helmet of the 6th Dragoons the Inniskillins. One of the Great Irish Cavalry Regiments in the British Army & One of The Most Desirable of All The Victorian Regimental Helmets
One of the best surviving examples one can see in or out of a museum
They served in the Crimea in 1854, losing all its horses en route in a fire on board its troop ship, but still managing to take part in the charge of the Heavy Brigade at Balaklava.
The regiment was deployed to the Crimea in April 1854 but during the voyage the regiment's transport ship Europa sank with the loss of the commanding officer, Lieutenant Colonel Willoughby Moore, and 17 of his men. Lieutenant-Colonel Henry Dalrymple White took over command of the regiment and led it in action at the Battle of Balaclava in October 1854.
The first assault line consisted of the Scots Greys and one squadron of the Inniskillings, a total of less than 250 sabres. Only when the RSMs declared themselves happy with the alignment did Scarlett order his bugler to sound the 'Charge'. The idea of a charge conjures up images of the Light Brigade dashing forward at speed but Dragoons were larger men with much heavier equipment so their charge was more of a trot. Floundering at obstacles such as ditches or coppices they headed towards the massed ranks of Russian cavalry, pressing on inexorably at a mere 8 miles an hour. Slow they may have been but the effect of these heavy cavalrymen slamming into the much lighter Russian cavalry stunned their enemy. A letter from a Captain of the Inniskillings illustrates the mellee which followed:
"Forward - dash - bang - clank, and there we were in the midst of such smoke, cheer, and clatter, as never before stunned a mortal's ear. it was glorious! Down, one by one, aye, two by two fell the thick skulled and over-numerous Cossacks.....Down too alas! fell many a hero with a warm Celtic heart, and more than one fell screaming loud for victory. I could not pause. It was all push, wheel, frenzy, strike and down, down, down they went. Twice I was unhorsed, and more than once I had to grip my sword tighter, the blood of foes streaming down over the hilt, and running up my very sleeve....now we were lost in their ranks - now in little bands battling - now in good order together, now in and out."
In the words of Colonel Paget of the Light Brigade "It was a mighty affair, and considering the difficulties under which the Heavy Brigade laboured, and the disparity of numbers, a feat of arms which, if it ever had its equal, was certainly never surpassed in the annals of cavalry warfare, and the importance of which in its results can never be known.
It then took on peacekeeping roles in India in 1857 after the Mutiny and in South Africa in 1880 after the Zulu War.
It fought as mounted infantry in the Boer War. After the outbreak of the Second Boer War in October 1899, the regiment was sent to South Africa. It formed part of General French′s force in the operations around Colesberg, and afterwards one squadron took part in the relief of Kimberley in February 1900.22 The squadrons of the regiment then rejoined, and formed part of the cavalry brigade which served in all the engagements in the general advance on Pretoria, one of the Boer capitals, which was captured on 5 June 1900. They took part in the battles of Diamond Hill (June 1900) and Belfast (August 1900), and in the following cavalry advance on Barberton in the Eastern Transvaal. The regiment subsequently joined a column under the command of Colonel Michael Rimington in the Orange River Colony, taking part in miscellaneous raids and drives there throughout the last year of the war, which ended with the Peace of Vereeniging on 31 May 1902. Following the end of the war, 257 officers and men of the regiment left Cape Town on the SS Orissa, which arrived at Southampton in late October 1902,23 and another 138 men arrived at Queenstown the following month on the SS Orient.After their return, the regiment was stationed at Curragh. One of its lieutenants, Lawrence Oates, was recommended for the Victoria Cross and is best known for his last words - 'I am going out, I may be some time' - shortly before his death on Scott’s expedition to the South Pole in 1912.
The unit served mainly as infantry on the Western Front during the First World War, suffering heavy casualties on the rare occasions it charged as cavalry. read more
2275.00 GBP

A Very Fine, 17th Century, King 'William & Queen Mary' Period Hangar Sword Cutlass of Senior Naval Officer's Admirals and Captains of the Royal Navy. & Notorious Pirates 🏴☠️ Gold Inlaid Flower Head Stamped Blade
From a superb family collection we just acquired, that was accumulated over decades, of fine early swords, pistols and cutlasses.
The sword of choice for senior officer's {Admirals and Captain's} serving in the Royal Navy during the 17th and early 18th century. We show three portraits in the gallery of admirals of the age each bearing their same swords, plus notorious pirates Blackbeard using the same sword.
Short flat sided blade. Antler handle made of antler of a male deer, called “hartshorn,” brass single knuckle bow bar hilt with cap pommel.
Blade bears two armourer's marks, of an 8 petealed flower stem and leaf with gold inlay. Overall in superb condition for its age.
Another very similar 'William and Mary period cutlass hangar was recovered {in a very poor state} from the wreck of notorious pirate, Captain Blackbeard's ship, the Queen Anne's Revenge, that was found at Beaufort inlet in 1996, the remains of the vessel have become the property of the people of North Carolina. And another 'William and Mary' period sword-cutlass is in a museum collection in Colonial Williamsburg in America.
William and Mary were the co-regnants over the Kingdoms of England, Scotland, and Ireland, namely the Dutch Prince of Orange King William III (& II) and his spouse (and first cousin) Queen Mary II. Their joint reign began in February 1689 after they were offered the throne by the Convention Parliament irregularly summoned by William after his victorious invasion of England in November 1688, the so-called Glorious Revolution. They replaced James II (& VII), Mary's father, who fled the country. Parliament offered William and Mary a co-regency, at the couple's behest. After Mary died in 1694, William ruled alone until his death in 1702. William and Mary were childless and were ultimately succeeded by Mary's younger sister, Anne.
This was the most popular form of sword used by the early British Naval Commanders when at sea. There are numerous great portraits in the National Gallery, and at the National Maritime Museum, of 17th and 18th century Admirals adorned with identical swords. Such as Admirals Benbow, Shovel et al. we show three such portraits in our gallery, of Hopsonn, Shovel and Benbow.
Vice-Admiral John Benbow (10 March 1653 – 4 November 1702) was an English Royal Navy officer. He joined the Navy in 1678, seeing action against Barbary pirates before leaving to join the Merchant Navy in which Benbow served until the 1688 Glorious Revolution, whereupon he returned to the Royal Navy and was commissioned.
Benbow fought against the French Navy during the Nine Years' War, serving on and later commanding several English warships and taking part in the battles of Beachy Head and Barfleur and La Hogue in 1690 and 1692. He went on to achieve fame during his military accomplishments, which included fighting against Barbary pirates such as the Salé Rovers, besieging Saint-Malo and seeing action in the West Indies against the French during the War of the Spanish Succession.
Admiral of the Fleet Sir Cloudesley Shovell (c. November 1650 – 22 or 23 October 1707) was an English naval officer. As a junior officer he saw action at the Battle of Solebay and then at the Battle of Texel during the Third Anglo-Dutch War. As a captain he fought at the Battle of Bantry Bay during the Williamite War in Ireland.
As a flag officer Shovell commanded a division at the Battle of Barfleur during the Nine Years' War, and during the battle distinguished himself by being the first to break through the enemy's line. Along with Admiral Henry Killigrew and Admiral Ralph Delaval, Shovell was put in joint command of the fleet shortly afterwards.
During the War of the Spanish Succession, Shovell commanded a squadron which served under Admiral George Rooke at the capture of Gibraltar and the Battle of Málaga. Working in conjunction with a landing force under the Earl of Peterborough, his forces undertook the siege and capture of Barcelona. He was appointed commander-in-chief of the Navy while at Lisbon the following year. He also commanded the naval element of a combined attack on Toulon, base of the main French fleet, in coordination with the Austrian army under Prince Eugene of Savoy in the summer of 1707. Later that year, on the return voyage to England, Shovell and more than 1,400 others perished in a disastrous shipwreck off the Isles of Scilly.
Thomas Hopsonn enjoyed a naval command on 18 May 1688, when James II appointed him to the Bonaventure. This ship was part of the fleet sent to The Nore under Strickland to prevent the Dutch invasion. However, Hopsonn was one of the conspirators within the fleet who supported William of Orange in the Glorious Revolution.
Following the revolution, Hopsonn retained command of the Bonaventure and was part of the squadron that relieved the siege of Derry in June 1689. On 28 October 1689, he was posted to the York, and commanded that vessel during the battle of Beachy Head the following year. Hopsonn's immediate commander in the battle was Sir George Rooke, who formed a high opinion of his gallantry and was afterwards much associated with him. He commanded Royal Katherine for two months starting in August 1690, before moving to command the St Michael. It was aboard the latter that he followed Rooke in the battle of Barfleur on 19 May 1692. In the same year, he was promoted to become a captain in the foot guards on the recommendation of admiral Edward Russell.
Blackbeard or Edward Teach (c.1680-1718) is one of the most infamous pirates to have ever lived.
Known for his fearsome image and daring acts on land and sea throughout the West Indies and along the North American East coast, his legacy has been the inspiration for many depictions of pirates throughout history. In possibly his most brazen act, Teach used his flotilla to blockade the port of Charlestown in the province of South Carolina. Over the course of a week, nine vessels were stopped and plundered as they attempted to sail out of the harbour, where Teach's fleet was moored.
Teach informed some of his prisoners that his fleet required medical supplies from the colonial government of South Carolina and that if none were provided, all would be beheaded and their ships burned.
Two pirates and a prisoner were sent to the town but when they did not return he moved eight ships into the harbour, causing panic and looting within the town. Shortly after his supplies were delivered and the prisoners released, after reportedly being robbed of all worthy possessions.
This siege represents the height of Teach’s notoriety, not just as a skilled captain but a fierce leader who was not confined to the sea and would maraud where he pleased. Exploits such as these made Teach was one of the most commonly reported pirates in the news and in the print of his age.
22.75 inches long overall, 17.5 inch long blade read more
895.00 GBP

A Fantastic and Phenomenally Powerful Two Handed Viking War Hammer Axe. Weighing Just Under Four Pounds. Wheeler Classification As A, Type I Circa 840 AD, Around 1200 Years Old. As used By The Huscarls, Danish Vikings, The Bodyguards Of Kings
This is a monstrously powerful axe of incredible heft. Used with the long haft somewhat akin to the axe of a Huscarl, the Danish Viking mercenaries that were famously the personal guard of King Harold at the battle of Hastings. Incredibly well preserved for its age, and remarkably still bears the remains of the wooden haft in the affixing aperture. Axes like this are categorized by the 1927 Wheeler classification system of Viking armaments, which groups pieces based off their shape, size, and intended use.
Danish Huscarls (Old Norse for "house-men") were elite, professional Viking warriors and bodyguards for Scandinavian and Anglo-Danish kings, renowned as fearsome shock troops in the 10th-11th centuries, serving as personal guards, heavy infantry, and the core of armies, famous for their heavy armour, Dane axes, and loyalty, notably forming King Harold Godwinson's elite at the Battle of Hastings.
Unlike militia (fyrd), Huscarls were full-time, well-trained, paid warriors. They served directly in the king's household, guarding his person and wealth.
Accordingly they held high status, ate at the king's table, and were bound by strict honour codes.
Provided personal protection for kings, notably Cnut the Great and Harold Godwinson, Earl Godwinson, later, King Harold of England
They formed the backbone of armies, equipped for brutal close-quarters combat.
The Dane Axe was famous for wielding large, two-handed axes, of incredible heft weighing near 2 kilos, or even more, that were devastating to enemy formations.
They wore chainmail, helmets, and carried shields (round or kite-shaped).
Central to military power during Danish rule under Cnut the Great (1015-1035).
Battle of Hastings (1066): King Harold's Huscarls formed his elite core, fighting ferociously but ultimately overwhelmed by Norman forces.
In essence, Danish Huscarls were the medieval equivalent of special forces, representing the pinnacle of warrior skill and loyalty in their era
Introduced by King Cnute, The Huscarls were the Royal Bodyguard and the elite fighters in the English field armies of the time. Highly trained, highly paid and highly motivated, they were the best and most highly feared troops in Europe, armed with long two handed axes, often in the later Viking age, they had an axe with a broader cutting edge, but the earlier Viking age around the 800's to 900's they had narrower cutting edges, as has this one, and it is said they were especially good for smashing helmets and piercing or crushing chain mail armour.
In the early Viking Age, the cutting edge of big axes measured from 7cms, {as is this one}, to 15 centimetres, while later Viking and Danish axes became wider. The later Danish Huscarl axe had a crescent-shaped cutting surface that measured 22 to 45 cms. The earlier 800's a.d. double handed axes were far more dedicated as single purpose weapons, with such a limited cutting edge they had no servicable use for cutting wood at all, crushing smashing and killing was there sole purpose. The later 11th century examples, could, if absolutely neccessary be used to cut down a tree.
Royal Huscarls are thought to have numbered three thousand - a great number of men to pay in those days. A special tax of one silver mark per ten hides was levied to pay the Huscarls. Further to their pay in coin (deemed to have been monthly) they were housed and fed initially from the king's coffers. Whether the king armed them as well is not known for certain. Gifts of weapons and equipment would have been made periodically to maintain their loyalty, in the manner of Scandinavian kings being 'ring-givers' in the early days of the Vikings. They would have had to have means of their own, as a king might easily dismiss them from his service for 'conduct unbecoming', to pay for their own armament and at least one horse to take him to fight (although in common with most other warriors of the northern world they fought on foot in time-honoured fashion). A huscarl's equipment amounted to mail-shirt (later mail-coat similar to the Normans' hauberk), one or more helmets, shields, spears and 'Dane-axe', the very effective long-shafted, two-handled fighting axe.
Knowledge about the arms and armour of the Viking age is based on archaeological finds, pictorial representation, and to some extent on the accounts in the Norse sagas and Norse laws recorded in the 13th century. According to custom, all free Norse men were required to own weapons and were permitted to carry them all the time. These arms were indicative of a Viking's social status: a wealthy Viking had a complete ensemble of a helmet, shield, mail shirt, and sword. However, swords were rarely used in battle in the same quantity as axes, as few Vikings were of the status to own or carry a sword, A typical bondi (freeman) was more likely to fight with a spear, axe, with shield and most also carried a seax as a utility knife and side-arm. Bows were used in the opening stages of land battles and at sea, but they tended to be considered less "honourable" than a melee weapon.
The warfare and violence of the Vikings were often motivated and fuelled by their beliefs in Norse religion, focusing on Thor and Odin, the gods of war and death. In combat, it is believed that the Vikings sometimes engaged in a disordered style of frenetic, furious fighting known as berserkergang, leading them to be termed berserkers. Such tactics may have been deployed intentionally by shock troops, and the berserk-state may have been induced through ingestion of materials with psychoactive properties, such as the hallucinogenic mushrooms, Amanita muscaria, or large amounts of alcohol. Perhaps the most common hand weapon among Vikings was the axe swords were more expensive to make and only wealthy warriors could afford them. The prevalence of axes in archaeological sites can likely be attributed to its role as not just a weapon, but also a common tool. This is supported by the large number of grave sites of female Scandinavians containing axes. Several types of larger axes specialized for use in battle evolved, with larger heads and longer shafts.
Vikings most commonly carried sturdy axes that could be thrown or swung with head-splitting force. The Mammen Axe is a famous example of such battle-axes, ideally suited for throwing and melee combat.
An axe head was mostly wrought iron, possibly with a steel cutting edge. This made the weapon less expensive than a sword, and was a standard item produced by blacksmiths, historically.
Like most other Scandinavian weaponry, axes were often given names. According to Snorri Sturluson's Prose Edda, axes were often named after she-trolls. A bearded 10th century Viking battle axe that could double as a throwing axe from the time of the last Viking, English King, Eric Bloodaxe, King of Northumbria. Probably the eldest son of King Harald Finehair The first King of all Norway. Eric's name probably derives from the legend that he murdered most of his 20 brothers, excepting Hakon. This was an unfortunate error as, upon Haralds death, Hakon returned to Norway from Britain to claim Harald's throne, and removed Eric from his Kingship. His elder brother Eric then fled Norway to Britain and to King Athelstan, an old friend of his father's, whereupon he took the Kingdom of Northumbria in around 947 a.d. While the sagas call him 'Bloodaxe', one of the Latin texts calls him fratris interfector (brother-killer), but, for whatever reason his name was derived, it was certainly a fine example of the descriptive titles the Viking warriors had, and that we are told of in the Viking sagas.
Weighing just under 4 pounds, 9 inches {23 cms} x 2.5 inches {7cms} read more
1595.00 GBP

Most Rare & Desirable, Status Ring, An Original Ancient Roman Bronze Ring Engraved With A Roman Legion’s Eagle Standard. An Image Of An Ancient Roman Legion's Standard Possibly For The Legion's Aquilfer {Standard Bearer} Circa 1700 Years Old
A fabulous Ancient Roman bronze Legionary's ring, from the era of Emperor Constantine The Great. The ovoid bezel is intaglio engraved with a Legionary Eagle, with its head turned to the viewers left (Aquila) with what appears to be the lightning bolt within its left claw. In superb, original, natural age patina of a rich dark bronze colour. The eagle was a powerful symbol to the Roman military. With each Roman legion a special eagle-bearer (aquilifer) had the honour of carrying the Legionary Eagle standard into battle and to guard its existence. Unusually, it is a comfortably wearable sized ring {which is somewhat rare due to original ancient Roman rings and armilla being usually smaller sized} In copper bronze with stunning, natural age patination.. By far the greatest percentage of rings from the Roman era were engraved in the stylised form, but a very small percent, perhaps less that .01 percent, were engraved in the realism form. This is one of those rare types of more realistic engravings. The wearing of the ring was the prerogative alone of Roman citizens or those of high rank and esteem, and legionaries. Some gladiators always aspired to but rarely achieved the ring likely due to their short life span within their violent craft. However, some did achieve such great success and were rewarded with riches, freedom and the right to wear the traditional Roman bronze status ring.
The decisive moment in the civil war of 312 ad came when Constantine I defeats his rival’s armies at the Battle of Turin – Constantine I also defeats forces loyal to Maxentius. At the Battle of Verona – Constantine I defeats more forces loyal to Maxentius. An on the 28 October – Battle of Milvian Bridge – Constantine I defeats Maxentius and takes control of Italy. Constantine was now in full control of the Roman West. But, more importantly, the victory over Maxentius marked a crucial threshold in the Roman Empire’s history. Apparently, prior to the battle, Constantine saw a cross in the sky and was told: “In this sign shall you conquer.” Encouraged by the vision, Constantine ordered his troops to paint their shield with the chi-rho emblem (initials symbolizing Christ). The Arch of Constantine, built to commemorate the victory over Maxentius, still stands in the centre of Rome.
The eagle was a powerful symbol to the Roman military. With each Roman legion a special eagle-bearer (aquilifer) had the honour of carrying the Legionary Eagle standard into battle and to guard its existence.
During a battle, the standard was carried by the aquilifer, or "eagle-bearer."
The standard was the mode of communication for generals and troops. A horn blast would instruct the soldiers to look to the emblem, then the aquilifer would wave, raise, or lower it to direct the troops on their next move.
The bearer was also tasked with guarding the standard. In terms of rank, aquilifers fell just underneath centurions. Within the legion, they received higher pay and better rations than the typical soldier.
The standard served as a symbol to place the legion as a collective above the individual. Losing a standard was emotionally devastating because of its intense symbolism. When one was lost in battle, the surviving legionaries were left in shame for failing their fallen brothers in arms. The group promptly disbanded and members devoted themselves to reacquiring the lost icon.
Standards often included an image of the reigning emperor or his name beneath the eagle, adding to the importance of the symbol. In many instances, the eagle on the standard was perched above an orb, signifying Rome's dominion over the entire world.
Subdivisions of legions each carried a smaller standard that identified their group number or name. These were used to quickly assemble the components of the legion when mobilizing for battle.
Some of the most famous standards in Roman history were the ones lost at the Battle of Teutoburg Forest in 9 AD. During a long campaign to conquer Germania, the tribes lured three legions into the forest and launched a guerilla warfare campaign, slaughtering the Roman soldiers.
In 16 AD, General Germanicus led his Roman troops into Germania to seize the lost standards, crossing borders established by Augustus.
Eagles played a central role in Roman life and culture, right from the society's inception.
The aquila, or eagle, is one the most enduring symbols of Roman civilization.
While different animals and mythological creatures served as meaningful signifiers throughout the Republic and Imperial eras, the eagle continuously symbolized power and authority.
In the city's founding myth, the brothers Romulus and Remus agreed to settle their dispute over where to build their kingdom by letting the gods decide. Remus spotted six eagles and Romulus later spotted twelve of the birds.
The eagle was considered majestic and transcendent, to the point that live birds were often caged on emperors' funeral pyres. Once they broke free and flew skyward, the Romans considered it a manifestation of the deceased emperor's transition to godhood.
Ancient Romans esteemed the eagle and adopted it as a symbol of victory. Pliny the Elder wrote extensively on eagles, noting that they possessed excellent eyesight and were skilled parents.
Symbolically, he claimed eagles were the only creature immune to lightning strikes, underscoring their divinity. Up to modernity, eagles are depicted with lightning bolts clutched in their talons.
The earliest standard used by the Roman army was a bundle of straw affixed to a tall staff. Over time, the Romans began using emblems of eagles, wolves, minotaurs, horses, and boars.
Following a crushing defeat in 105 BC at the Battle of Arausio during the Cimbrian War, the Romans completed a self-assessment. The consul Gaius Marius led a reorganization of the military structure. Marius' reforms transformed the Roman legions from a loose militia into a professional fighting force.
As part of the restructure, he declared the eagle as the military's standard and retired the other four creatures mentioned above. Putting the emphasis on the eagle was meant to place its central qualities, bravery and power, at the forefront of the army's identity.
From the mid-Republican era onwards, the standard was a bronze or silver Aquila with spread wings.
Emperor Constantine the Great
Emperor Constantius died in York, England. The system of succession at the time demanded that another Caesar should become emperor but the soldiers in York immediately proclaimed Constantine their leader. It proved to be a pivotal moment in history. He is known as Constantine the Great for very good reasons.
After nearly 80 years, and three generations of political fragmentation, Constantine united the whole of the Roman Empire under one ruler. By 324 he had extended his power and was sole emperor, restoring stability and security to the Roman world.
Constantine also abandoned Rome as the most important city in the empire, building a new capital modestly named Constantinople (now Istanbul). In the next two centuries, Rome and Italy became vulnerable to barbarian invasions. The much more easily defensible Constantinople lasted for another thousand years.
Finally, and perhaps most famously, Constantine’s strong support for Christianity had an incalculable impact on European history. He is said to have been converted to the faith in AD 312, although this has not been corroborated.
At the time only around ten per cent of the Roman empire’s population was Christian. The majority of the ruling elite worshipped the old gods of Rome. Constantine was the first emperor to allow Christians to worship freely, helping to unite and promote the faith. He went on to instigate the celebration of the birth of Christ we call Christmas.
One image in the gallery is of The Battle of the Milvian Bridge that took place between the Roman Emperors Constantine I and Maxentius on 28 October AD 312. It takes its name from the Milvian Bridge, an important route over the Tiber. Constantine won the battle and started on the path that led him to end the Tetrarchy and become the sole ruler of the Roman Empire. Maxentius drowned in the Tiber during the battle; his body was later taken from the river and decapitated, and his head was paraded through the streets of Rome on the day following the battle before being taken to Africa.
*Note behind the mounted figure of emperor Contantine is the emperor's legion's eagle standard, held aloft by his aquilfer.
Outside diameter: 22mm, UK size Q1/2, US 8.25 Signs of light wear consistent with age and use, yet still wearable. read more
995.00 GBP

A Cased Pair Of Attractive, Antique, Victorian, Belgian Percussion Boxlock Pistols. A Pair of 'Barkers' Set in a Walnut Box Case In The French Style. Walnut Bag-Shaped Pistol Grips
Just returned from the workshop in order to have considerable conservation to both pistols, taking several days, in order to have both their surface finishes hand cleaned, polished, re-blued and conserved, plus, their actions oiled. Walnut box is a later casing in the French style.
The nickname 'Barkers' was popularized in 19th-century literature. For example, in Charles Dickens' 1837 novel Oliver Twist, a character prepares for a robbery by arming himself with a pair of "barkers".
A very similar percussion 'Barker' appears in a photograph, in the book 'Crimean Memories', by Hutchinson, Vice and Small, {Page 169} used by Surgeon M.B. Munro of the 93rd {Sutherland Highlanders} of Foot in the Crimean war, as one of a pair of his personal defence weapons. Now in the Regimental Argyll and Sutherland Highlanders Museum.
Boxlock pistols were pocket pistols popular in the late 1700s and early 1800s. Effectively the first Derringers. The most unique feature of their design was the boxlock mechanism. Unlike most firearms which have the hammer located off to the side of the pistol, a boxlock pistol had the hammer located directly on top of the pistol. They were called a boxlocks because all of the working mechanisms for the hammer and the trigger was located in a box or receiver directly below the top mounted hammer. While the hammer obstructed the aim of the user, this system had the advantage of making the gun more compact and concealable than other pistols. The first boxlock pistols were flintlock and where later made in percussion lock. Unlike modern firearms, these pistols were not mass produced, but were hand made in gunsmith's workshops.
In 18th and 19th-century slang, a pistol was called a
barker because its loud explosion was thought to resemble the "bow-wow" or barking of a dog.
The term originated as "barking iron," an Irish expression recorded in the 1785 Dictionary of the Vulgar Tongue. Over time, it was shortened simply to "barker." It was initially "cant" (thieves' slang) used by footpads and highwaymen during robberies.
The term was also adopted by Royal Navy seamen to refer to both small Sea Service pistols and larger lower-deck artillery pieces.
While other colourful nicknames like "pops," "snappers," and "meat in the pot" were also used during this era, "barker" remained a common term until the end of the 19th century.
Overall blued with light natural aged russet surface beneath, both actions are tight with good springs, one action fires well on double cocking, the second just on first cocking. The walnut box is good, with some old surface scratching, key lock works well.
Box case 8 inches x 10 1/5 inches x 2 inches, pistols, overall 8 1/2 inches each, barrel's 4 inches each.
Priced once the conservation cost has been calculated read more
1250.00 GBP

A Superb Later 19th Century French Chassepot M1866 Sword Bayonet, Post Franco Prussian War Issue, Manufactured at the Armoury of St Etienne. Japanese Purchase Import Used In The Japanese Russian War 8 February 1904 – 5 September 1905
Stunning example, with very good steel and brass, manufactured at the French arsenal at St Etienne to mount upon the service issue Chassepot rifle. Acquired by us from an exclusive high quality and rare service use bayonet collection, and this bayonet was bought by the collector in Japan as one of the rare survivors after service in the Russian- Japanese War, {as well as his Enfield Yataghan bayonets bought by Japan from America after the Civil War}. Although by the time of the war the Japanese generally used the type 22 Murata, some naval land troops were still in service with the 1880's French Chassepot-Murata conversions with Chassepot bayonets.
The Russo-Japanese War (8 February 1904 – 5 September 1905) was fought between the Russian Empire and the Empire of Japan over rival imperial ambitions in Manchuria and the Korean Empire. The major land battles of the war were fought on the Liaodong Peninsula and near Mukden in Southern Manchuria, with naval battles taking place in the Yellow Sea and the Sea of Japan.
Its inventor was, Antoine Alphonse Chassepot, and it became the French service weapon in 1866. It was first used at the battlefield at Mentana, November 1867, where it inflicted severe losses on Garibaldi's troops. The event was reported at the French Parliament: "Les Chassepots ont fait merveille!", {The Chassepots did marvelous execution !} In the Franco-Prussian War (1870-1871) it proved greatly superior to the German Dreyse needle gun, outranging it by 2 to 1. Although it was a smaller caliber but the chassepot ammunition had more gunpowder and thus faster muzzle velocity. The Chassepots were responsible for most of the Prussian and other German casualties during the conflict. This is the most widely copied of all the sword bayonets. Many countries - including the United States, Egypt, Belgium, and Argentina - have manufactured or used very similar bayonets. The French model was designed to fit on the French Model 1866 Chassepot Rifled Infantry Musket (the musket was revolutionary in itself). It was manufactured from 1866 to about 1874 and was replaced by the French Model 1874 "Gras" Bayonet.
The bayonets are brass-hilted The crossguard is iron (steel) and has a screw-type tightening arrangement on the muzzle-ring. The lower quillon is a hooked "blade-breaker" type.
The blade is steel, single-edged, fullered (both sides), with a re-curved or "yataghan-shape." The blades marked on the back-edge (opposite the cutting edge) with the arsenal, month, and year of manufacture; this is done in engraved cursive fashion
Arsenals encountered may be such as Chatellerault, Mutzig, St. Etienne, Paris-Oudry, Tulle, and perhaps Steyr (not confirmed on the 1866). The French wars during the life-span of this bayonet were: French Intervention in Mexico (1861-1867);
Franco-Prussian War (July 19, 1870 - May 10, 1871)
French Indo-China (1873-1874, 1882-1883);
Sino-French War (1883-1885);
Madagascar Wars (1883-1885, 1895);
1st Mandingo-French War (1883-1886);
1st Dahomeyan-French War (1889-1990);
2nd Dahomeyan-French War (1892-1894);
Franco-Siamese War of (1893)
2nd Mandingo-French War (1894-1895);
Conquest of Chad (1897-1914);
3rd Mandingo-French War (1898);
Japanese Russian War ( 8 February 1904 – 5 September 1905)
Moroccan War (1907-1912);
The Wadai War (1909-1911);
World War I (early).
These bayonets were widely copied and used by many countries - including the United States, Belgium, and Germany. Many of the actual French-marked bayonets can be found with German manufactured blades. It is believed some of these were used during the American Civil War when many European arsenals were emptied of their surplus arms.
These bayonets are the French Model 1866 "Chassepot" Bayonet.
The crossguard are iron (steel) and with a "cock's comb" muzzle-ring finial. The lower quillon is a hooked "blade-breaker" type.
The blade is steel, single-edged, fullered (both sides), with a re-curved or "yataghan-shape." One blade is marked on the back-edge (opposite the cutting edge) with the arsenal, month, and year of manufacture; this is done in engraved cursive fashion.
France sold large quantities of Chassepot rifles to Japan during the late 19th century, which Japan used alongside other imported arms, eventually leading to their conversion and adaptation into the indigenous Murata rifle, Japan's first domestically produced standard infantry rifle. Japan acquired Chassepots as part of broader efforts to modernize its military after opening from isolation, initially using them with their needle-fire system before converting them for metallic cartridges
Picture in the gallery {photo 7} of an anti-Russian satirical map that was produced by a Japanese student at Keio University during the Russo–Japanese War. It follows the design used for a similar map first published in 1877. read more
290.00 GBP

A Wonderful, Original, Antique Victorian Helmet of the 2nd Dragoon Guards {The Queen's Bays}
Superb condition with gilt finish skull and decor, all original lining present and chin chain. One of the best surviving examples one can see in our out of a museum
Following a long period of policing and garrison duties at home, the unit next deployed to India after the outbreak of mutiny there in 1857. It went on to help capture Lucknow in 1858.
It then spent most of the remainder of the 19th century garrisoning India or on home service. It also deployed to the Boer War (1899-1902) in 1901, taking part in the anti-guerrilla operations there, and sustaining heavy losses at Leeuwkop in 1902.
The outbreak of the First World War (1914-18) saw it deploy to the Western Front with the 1st Cavalry Division. It fought in both a mounted and infantry role in many engagements, including the Retreat from Mons, (1914), Le Cateau (1914), the Marne (1914), Ypres (1914), the Somme (1916), Arras (1917), Cambrai (1917) and the Scarpe (1918).
How Major George Harold Absell Ing, Of The 2nd Dragoon Guards (Queen's Bays), Won The D.S.O. At The Second Battle Of Ypres
On the evening of Wednesday, May 12th 1915, the 28th Division which held that part of our line from a point northeast of Verlorenhoek to the Bellewaarde Lake, and which had been fighting continuously since April 22nd, went into reserve, its place being taken by the 1st and 3rd Cavalry Divisions, under general de Lisle. It was a difficult line to defend, since there were no natural advantages and our trenches were to a large extent recently improvised. This cavalry were very speedily to discover to their cost, for early on the following morning a terrific bombardment began against their front, shells of every description raining down in a continuous stream. The brunt of the bombardment fell on the 3rd Division, and the 3rd Dragoon Guards, I the 6th brigade, were almost buried alive beneath the debris of their parapet. But farther north, where the 2nd Dragoon Guards were posted, close to the Ypres-Zonnebeke road, the shelling was also very heavy, and about 8 a.m. part of the regiment on their right began to retire, their trenches having been rendered untenable. The retirement might easily have become a general one, had not a brave officer of the Queen?s Bays, Major Ing, at great personal risk, saved the situation. Leaving his own trench, he ran out into the open road, standing there, with shells every moment bursting around him, stopped the retirement of some forty men and directed them to take shelter, some in shell holes and others in ditch beside the road on their flank. By this prompt and gallant action, for which he was subsequently awarded the Distinguished Service Order, Major Ing rendered a most invaluable service. Major Ing entered the 2nd Dragoon Guards in September 1900, and served in the South African War, in which he was slightly wounded, and for which he received the Queen?s Medal with five clasps. He was promoted captain in February 1914, and attained his present rank in August 1911. He is thirty-five years of age, and his home is at Crockham Hill, Kent. Extracted from 'Deeds That Thrill The Empire'
The regiment was renamed the Queen's Bays (2nd Dragoon Guards) in 1921 and spent the inter-war period in Egypt, India and England, where it mechanised with light tanks in 1937. Two years later, it joined the Royal Armoured Corps.
It fought in northern France in May and June 1940, before evacuating from Brest. By November 1941, it had recovered and re-equipped, deploying to North Africa and fighting at Gazala and the First and Second Battles of Alamein in 1942. At one point in the campaign, it remained in action continuously for a record 19 days - longer than any other armoured regiment in that theatre.
After taking part in the Tunisian campaign in 1943, it moved to Italy in May 1944, fighting in several engagements including the Battle of Argenta Gap (1945). read more
1995.00 GBP

Archaic Zhou Dynasty Bronze Halberd or ‘Ge’ Circa 5th Century BC the Period of the Great Military Doctrine 'The Art of War' by General Sun-Tzu
Another from our collection of stunning ancient Chinese swords and weaponry that we recently acquired, including halbeard axe called a 'Ge'.
This is the very type of original ancient ceremonial halberd, defined by the ancient Chinese as a dagger axe 'Ge' and exactly the type as used by the warriors serving under the world renowned General Sun Tzu, in the Kingdom of Wu, who is thought by many to be the finest general, philosopher and military tactician who ever lived. His 2500 year old book on the methods of warfare, tactics and psychology are still taught and highly revered in practically every officer training college throughout the world.
In excavated condition, cast in one piece, slightly curved terminal blade of flattened-diamond section, pierced along a basal flange with three slots, and a hole with fabulous areas of crystallized malachite, blue/green patina.
We also show in the gallery a painting of how this 'Ge' halbard would have been used once mounted 2500 odd years ago on its long haft, and used by a Zhou warrior, there is also one depicted being carried in a painting that we show in the gallery being used in an infantry charge in the Zhou dynasty.
This is a superb original ancient piece from one of the great eras of Chinese history, it is unsigned but near identical to another that was signed and inscribed with details that have now been fully translated, deciphered and a few years ago shown at Sothebys New York estimated to a sale value of $300,000. Its research details are fully listed below, and it is photographed within our gallery for the viewers comparison. Naturally, our un-inscribed, but still, very rare original version, from the same era and place, is a much more affordable fraction of this price
The signed and named Sotheby's of New York example that we show in the gallery, was formerly made for its original warrior owner, Qu Shutuo of Chu, it is from the same period and in similar condition as ours. We reference it's description below, and it is photographed within the gallery, it is finely cast with the elongated yuan divided by a raised ridge in the middle of each side and extending downward to form the hu, inscribed to one side with eight characters reading Chu Qu Shutuo, Qu X zhisun, all bordered by sharply finished edges, the end pierced with three vertically arranged chuan (apertures), the nei with a further rectangular chuan and decorated with hook motifs, inscribed to one side with seven characters reading Chuwang zhi yuanyou, wang zhong, and the other side with five characters reading yu fou zhi X sheng, the surface patinated to a dark silver tone with light malachite encrustation
An Exhibition of Ancient Chinese Ritual Bronzes. Loaned by C.T. Loo & Co., The Detroit Institute of Arts, Detroit, 1940, pl. XXXIII.
New Orleans Museum of Art, New Orleans, March - June 1948.
This inscribed bronze halberd blade, although typical in form, is uniquely important as its inscription serves as a critical primary source that reveals the name of its original owner: Qu Shutuo of Chu. The only known close counterpart to this blade is a damaged bronze halberd blade, missing the yuan, and inscribed on the hu with seven characters, which can be generally translated to ‘for the auspicious use of Qu Shutuo of Chu’. That halberd is now in the collection of the Hunan Provincial Museum, Hunan, and published in Wu Zhenfeng, Shangzhou qingtongqi mingwen ji tuxiang jicheng Compendium of inscriptions and images of bronzes from Shang and Zhou dynasties, vol. 32, Shanghai, 2012, no. 17048
The remaining thirteen inscriptions can be translated as: 'Qu Shutuo of Chu, Qu X's grandson, yuanyou of the King of Chu'. Based on the inscription, the owner of this blade can be identified as such.
See for reference; The Junkunc Collection: Arts of Ancient China / Sotheby's New York
Lot 111
We also show in the gallery a photo of another similar halberd from a museum exhibition, of a Chinese ancient king bodyguard’s halberd gilt pole mounts for his personal charioteer
This is one of a stunning collection of original archaic bronze age weaponry we have just acquired. Many are near identical to other similar examples held in the Metropolitan in New York, the British royal collection, and such as the Hunan Provincial Museum, Hunan, China. As with all our items, every piece is accompanied by a certificate of authenticity. Approx 9.75 inches across. read more
1995.00 GBP
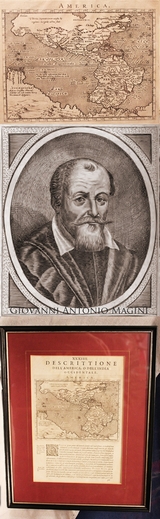
A Wonderful Original 16th Century Map of America By Giovanni Antonio Magini
A fabulous original historical artifact ideal for the collector with an interest in early maps and the earliest period of modern America. Magini (Giovanni Antonio), Plate XXXIIII, Descrittione Dell'America, O Dell'India Occidentale, no date [ printed in 1598], engraved map of America [North and South] with Italian text below, map plate 140mm x 180mm, uncoloured, mounted, framed and glazed. Giovanni Antonio Magini (in Latin, Maginus) (13 June 1555 11 February 1617) was an Italian astronomer, astrologer, cartographer, and mathematician. He was born in Padua, and completed studies in philosophy in Bologna in 1579. His father was Pasquale Magini, a citizen of Padua. Dedicating himself to astronomy, in 1582 he wrote Ephemerides coelestium motuum, translated into Italian the following year.
In 1588 he was chosen over Galileo Galilei to occupy the chair of mathematics at the University of Bologna after the death of Egnatio Danti. He died in Bologna. Magini supported a geocentric system of the world, in preference to Copernicus's heliocentric system. Magini devised his own planetary theory, in preference to other existing ones. The Maginian System consisted of eleven rotating spheres, which he described in his Novo colestium orbium theoric congruentes cum observationibus N. Copernici (Venice, 1589).
In his De Planis Triangulis (1592), he described the use of quadrants in surveying and astronomy. In 1592 Magini published Tabula tetragonica, and in 1606 devised extremely accurate trigonometric tables. He also worked on the geometry of the sphere and applications of trigonometry, for which he invented calculating devices. He also worked on the problem of mirrors and published on the theory of concave spherical mirrors. Framed 38cm x 30.5cm read more
935.00 GBP